Tuesday, November 7, 2017

Gear Review: Haeleum - Darian Camouflage Shirt

First light on Porcupine Flat

The Dirt:

Haeleum - Darian | Mossy Oak® Camoflauge Shirt

What is it? High tech hunting/hiking t-shirt

Fabric: 100% DryTru polyester

Technologies:

Sun Protection: UPF 50+

Bug Repellent: Insect Shield® 

Moisture Wicking

Quick Dry

Anti-microbial.


The Darian shirt by Haeleum is a high-tech piece of outdoor apparel with excellent versatility and an affordable price tag. While moisture wicking and quick drying fabrics are virtually the norm in performance t-shirts, adding anti-microbial, sun protection and bug repellent properties make this a truly unique piece.  

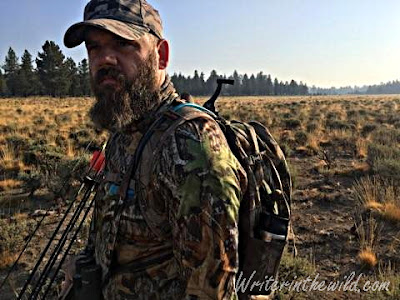
Over the last two months I've worn this shirt hiking and hunting all over the great state of Oregon. The Darian is soft and comfortable, and still looks new after a dozen washes. For me, the torso fit is perfect, but the arms are cut too short. I wear a large, and as far as I know my arms aren't unusually long. The Darian's sleeves stop well before my wrist bone, which results in me rolling them up when worn as a standalone piece.

The Darian really shines in the sun. Under a scathing September sun for three days on an early season bow-hunt in Central Oregon, I returned to camp every night dry. Credit the DryTru polyester fabric. I hate carrying sunblock and I hate wearing it even more. A 50+ UPF rating means that I'm protected, even in the hottest conditions.

Late in September I wore the Darian everyday for five days straight. All day long slogging up sloppy  mountainsides and bushwhacking through dense drainages. After some big climbs and big sweats, I never felt cold or wet. The shirt performed flawlessly. It dried quickly and always felt new. Even at the end of the trip. The shirt was wrinkle free and didn't stink. I could have wore it for another five days.

Insect repellent clothing is always in demand, but in late summer and fall in central Oregon, insects are simply not a problem. It was the only property of this shirt that I couldn't test. However, having a disdain for insect repellent sprays nearly equal to that of sunscreen, I have used Insect Shield® clothing in the past during the height of mosquito season and found it highly effective. Combined with the UPF rating, you're looking at a seriously protective shirt.

Overall I am absolutely impressed with this shirt. If you picked up a comparable shirt at any major outdoor retailer you could spend upwards of $100. That's the real beauty of it. The $36.99 price-tag is unbeatable. I would like to see a camouflage pattern more applicable to west coast hunting, but this isn't just a hunting shirt. I would recommend it for any year-round outdoor activity. Especially for those who carry less but expect more from their gear. The Darian shirt can do it all. 

In the high Cascades.


Disclosure of Material Connection: I received the Darian Camouflage Shirt for free from Haeleum in consideration for a gear review.

Sunday, July 23, 2017

Three Sisters Wilderness: Lucky Lake


South Sister
View of Lucky Lake as the trail intersects the lake.
 Lucky Lake is a beautiful mountain lake with great views of South Sister and Broken Top mountains, and it's easy to get to. In fact, the hike is just over a mile, and relatively flat the entire way. I hiked in on a weekday, looking for a quick getaway, and hopefully some fishing. The lake isn't as popular as many Three Sisters Wilderness destinations despite its beauty. Because of this (or maybe the hordes of mosquitoes) I had the lake to myself.

Camp, pre bug net.
 Campsites are concentrated on the south side of the lake. I chose the flattest spot with the best views and pitched my tarp. I was using for the first time a bug net/tarp combination. The net stops at the ground and does not have a floor. I was a bit nervous about its effectiveness pitching it in the midst of clouds of mosquitoes. But it worked great. I slept soundly, and no flying blood-suckers got in.

TFO
Why is my rod on the ground and not in my hand?
 Fishing didn't go so well. Lucky Lake's waters are crystal clear, and I didn't see a single fish of any size either in the water near shore or rising to the surface in deeper parts of the lake. I doubted that any fish were even in the lake despite what I had read online. Regardless, I spent most of the day circling the lake looking for fish and throwing out a fly absent sign of any. It basically became a day-long casting practice session. Lucky Lake isn't a very easy lake to fly fish anyway. Beaches are basically non-existent. In most places, trees grow right to the water's edge. Backcasting is nearly impossible without wading.

 Later that night I heard something big splashing in the water. From the water's edge near my camp I could see a big brown animal frolicking in the water across the lake. I couldn't tell what it was, and I kicked myself for not bringing my binoculars.

A serene morning on the lake.
After a good night's sleep, I awoke to a very quiet, peaceful lake. The water was completely still and the mountains glowed, spotlighted in the rising sun's rays. It's these moments that draw me to the woods. It's these moments that I sit up at night at home in bed thinking about.

Thursday, July 13, 2017

Gear Review: NEMO Blaze 2


The Dirt:

NEMO Blaze 2 

What is it? Two person ultralight backpacking tent

Double Walled: Yes

Freestanding: No

Comes with: Tent, fly, stakes and guyline.

Weight: 2 Ibs. (minimum trail weight)

Size: Floor 85"x 50". Height 40". Area 30 square feet.

Materials: Mesh. Floor 15D ripstop sil/PU Nylon. Fly and vestibule 10D sil/PU.


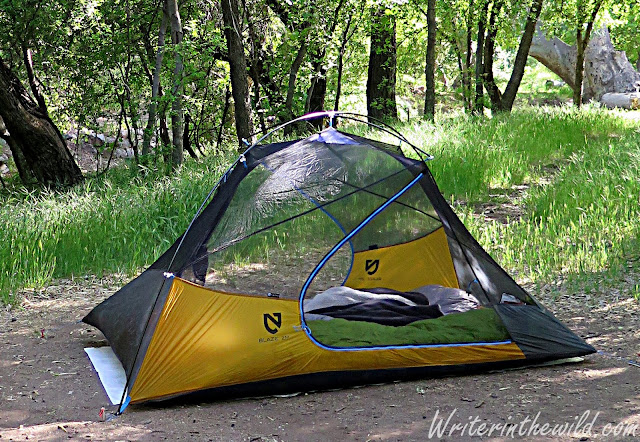
The NEMO Blaze 2 is a spacious, two person, double-walled, ultralight tent that separates itself from the pack with sheer livability. Unlike almost all other two person double-walled tents (that I know of) at 2 pounds or below, the Blaze 2 has two doors and a true dome design, bucking the current trend for tents in this category like the ever popular Big Agnes Fly Creek 2 with the single door teardrop shape. The Blaze 2 is a true ultralight double-doored dome.

Three Sisters
In Three Sisters Wilderness
NEMO accomplished this light weight dome very simply. They eliminated one pole of the classic 2-cross pole design. Yes, the Blaze has only one structural pole that runs from one corner to its opposite, and as such is NOT freestanding. They also added a small center pole that stretches the width of the tent and connects the top of both doors. This allows for vertical side walls and gives the Blaze its unparalleled livability. It also makes for a goofy looking pitch. As you can see from the photo below, the corners absent pole-to-ground contact are raised off the ground pretty significantly. I've  pitched this tent dozens of times and so far have not found a solution, however, I have not seen any drawback created by it. Lastly, the other big change from the run-of-the-mill is the shortened rainfly, which relies on the higher bathtub floor on both ends to keep out rain.

tent
Without the fly. Note the corners,

All these innovations may seem daunting to the traditionalist, but after over a year of regular use I'm impressed. It packs so small. I don't feel guilty taking it on solo trips when the expected weather scares me away from my tarp. When I'm backpacking with my girlfriend, who doesn't do minimalist, the weight is a non-issue. We don't have to split anything up, and she's happy in camp. She's happy with the inside space and she loves having her own door. Let's face it, most 2-person backpacking tents are small, but the ultralight versions are coffins. Some ultralight 2-person tents have no business calling their tent "two person". The NEMO Blaze is not one of those tents. It's made for two, no doubt.

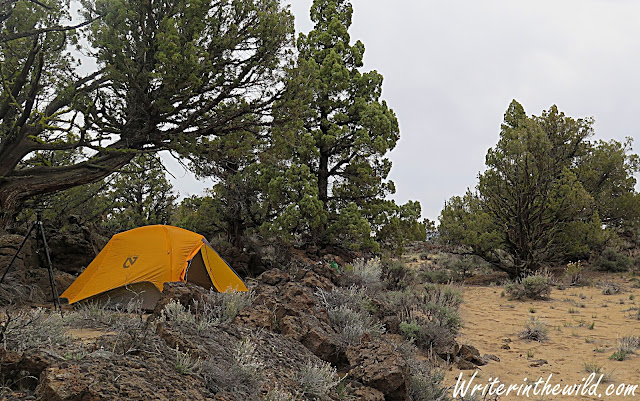
The Blaze can handle the weather too. I've had it in wind on Mt. Lemon, and rain in the Oregon Badlands. It's sturdy and watertight. My only real gripe is the color. I know that sounds weird but hear me out. Bright yellow attracts bees! No joke. It's like they think it's a giant California Poppy or something. If bees are around, they will come when you pitch this tent. Not that big of a deal unless you're allergic, or tenting in Africanized bee territory, like the Sanoron Desert... But then again, if you're in the Sanoron Desert, why are you pitching the fly anyway?

Oregon Badlands
In the Badlands
Overall, I'm super stoked on the Blaze 2. If you want a comfortable, ultralight tent for two, this is your tent. It's got all the conveniences of heavier tents in such a small, light package. I would recommend it particularly if you are actually backpacking with a partner and don't want to trade comfort for weight. It's also perfect for the backpacker who only wants one tent for everything. It's roomy enough for two but light enough for one. It's sturdy and dependable, and the quality is typical NEMO top-notch. The biggest drawback is that you might have to sell a kidney to pay for one.

Tuesday, June 20, 2017

Budget Gear Review: Kangaroo Outdoors Rocky Mountain Trekker

Rocky Mountain Trekker in the wilderness


The Dirt:

Kangaroo Outdoors Rocky Mountain Trekker 

What is it? Mummy style backpacking sleeping bag.

Comes with: Sleeping bag, compression stuff sack.

Weight: 3.1 pounds (in stuff sack)

Temp Rating: 32 degrees Fahrenheit

EN Rating: No

Materials: Rip-stop nylon

Insulation: Synthetic
.
The Rocky Mountain Trekker is a budget friendly lightweight mummy bag for 3-season backpacking. I was contacted by someone from Kangaroo Outdoors to write this review, and I have to say that Kangaroo Outdoors, the company, is a bit of a mystery. They don't have a website, and as far as I can tell, the only product they make is this sleeping bag. Regardless, the product description on Amazon assures us that "Kangaroo Outdoors is committed to bringing you only the highest quality outdoor gear. We design and test all of our items in the high Rockies of Colorado." Due to the lack of information on Kangaroo Outdoors and the Rocky Mountain Trekker online, this review will be entirely what I've observed through use.

Pulling it from the box, the first thing I notice is the size. In the provided compression sack, it packs pretty small. Without the compression sack however, it's bulky. In fact, I had trouble stuffing it in a 50 liter backpack on a recent outing. The weight isn't bad either.... for the price. Granted, today's higher end 30-degree down bags barely bust the 1 pound mark, but they are hundreds of dollars. At around 40 bucks, 3 pounds is pretty damn good, and certainly an acceptable weight for most weekend backpackers. On short trips, the weight is barely noticeable. And that's really what the Rocky Mountain Trekker is for, short trips for casual backpackers who don't want to break the bank.


The concern with buying a budget bag is always materials and craftsmanship. Kangaroo Outdoors lists the bag material as rip-stop nylon, but doesn't list a grade. Insulation type is synthetic, but doesn't say what kind. The truth is that the materials make it feel like a forty dollar sleeping bag. But it performs. On multiple backpacking trips when the temperature flirted with freezing, I always stayed warm. Granted, I was wearing baselayers and using a bag liner, but I always do, even with my Marmot and Nemo bags. On breezy, chilly, rainy nights, The Rocky Mountain Trekker continued to surprise me. Even when a chill crept in, I was able to cinch the hood and draft tubes to effectively trap my heat in. This bag does not have a European Norm rating, but the claimed 32 degree comfort rating seems pretty darn accurate.

Rocky Mountain Trekker

Like budget bags I've owned in the past, the biggest problem I had was the zipper. It didn't completely burst open like my last budget bag did, but I fought with it in the night, every night. For starters, snagging was an issue. I found completely zipping up the bag was a challenge and a chore. Even more annoying was the tendency for the zipper to unzip itself during the night. Strangely, pressure on the underside of the zipper would cause it retract. As a result, unless I had the zipper completely up and secured with the Velcro strap, it would retract during the night and I would wake up exposed. 

Overall, The Rocky Mountain Trekker is a solid 3-season bag with an affordable price tag. I would recommend it for new backpackers or anyone who can't afford a name-brand bag. For the experienced or constant backpacker, I would give it a look only if money is a serious concern for you. Otherwise, it would make a good loaner or backup. Durability may be an issue. After all, I don't know anything about materials or manufacturing. I couldn't find any warranty information from Kangaroo Outdoors either. But then again. it's only a 40 dollar bag.

Disclaimer: I was given this sleeping bag for the purposes of a review by Kangaroo Outdoors at no cost to myself. The opinions and conclusions reached are strictly my own.

Wednesday, February 22, 2017

Smith Rock State Park: Wolf Tree Trail

Smith Rock State Park
Wolf Tree Trail

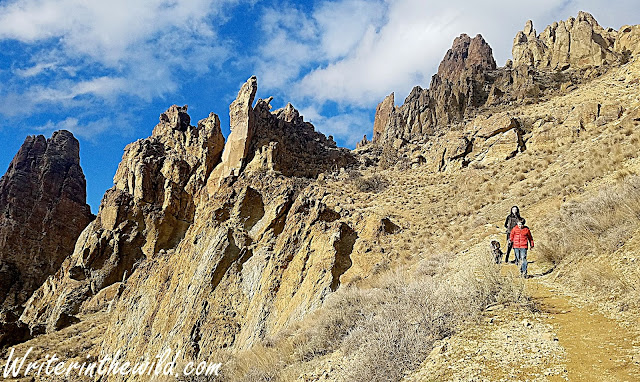
The famous Smith Rock State Park. A local favorite. A climbers dream. A place I'd never been, until now. It was a sunny Saturday morning and we chose a less popular path, Wolf Tree Trail. The trail follows The Crooked River and quickly drops into a delightful juniper/ponderosa pine woodland. The masses don't seem to go this way. Except for the sound of the rushing water it was quiet. Close-up views of the giant rocks that make this place famous parallel the trail (for a close-up of the climbing, bring your binoculars). 

Crooked River
While short and easy, Wolf Tree Trail does offer some options for extending your hike. I recommend the short Burma Road Trail. While steep and exposed, the views at the top are jaw-dropping. From there, connect to the 7.5 mile Summit Loop for a walk around the entire park, or turn around to head back to the trailhead.

Smith Rock State Park
Descent from Burma Road
The Wolf Tree Trail, with The Burma Road side trip, is an easy three mile in-and-out. For me it felt like a teaser. Although satisfied with the views, I found myself wanting more as I climbed back out of The Chute to the parking lot. It's a small park. An ambitious hiker could hit every trail in a weekend trip. I'll put that on my "to-do" list.

Smith Rock State Park
Talus slope

Wednesday, February 8, 2017

Budget Gear Review: Etekcity Backpacking Stove


Etekcity Backpacking stove at Mt. Lemmon, AZ
The Dirt:

Etekcity Backpacking Sove

What is it? Canister style backpacking stove

Fuel Type: Isopro

Comes with: Stove, plastic case, attached Piezo ignition

Weight: 4.8 oz.

Size: 3.5 X 1.8 X 2.3 inches

Materials: Stainless steel and aluminum


The Etekcity Backpacking stove is a lightweight canister stove that sells for a ridiculously low price on Amazon. In fact, that's why I'm writing this review... Let me explain. Just over a year ago, a customer came to my store looking for a backpacking stove. After I gave him a brief explanation of the stoves we carry and the differences between them, I recommended the MSR PocketRocket. He stared at the price-tag looking perturbed for a moment, then looked at me quizzically and asked, "Why should I spend $40 on this stove when I can get one on Amazon for $10?" I didn't know how to respond at the time since I had no idea which stove he was talking about. Instead I just mumbled something about brand name, materials and construction. Feeling ignorant and unprepared, I went home that night, and in the Amazon search bar typed, "ten dollar backpacking stove," and promptly purchased the first stove on the list, the Etekcity Backpacking Stove. I would have an answer the next time a customer asked me that question.

Palm of my hand
Out of the box, the first thing that struck me was the size. Indeed, the Etekcity stove is smaller than the vast majority of canister stoves on the market. Credit the stowable pot support arms that fold down and swivel around the stove to stack on top of each other like a deck of cards. It makes for a small, very portable package. The drawback with that portability is all those joints and swivels add weight. 4.8 ounces (believe it or not) is heavier than most name brand stoves in the same class. But for ten bucks, who can complain about an ounce or two? 

The biggest problem I have with stowable arms is durability. Simply put, the more complex the device, the larger the chance the device will fail. In fact, the first time I used the stove one of the arms jammed. I couldn't get it folded without a lot of force, which, in freezing temps hurt my fingers like a SOB. It turned out that the upper portion of one of the arms bent, which prevented it from folding along the joint. It's not just the arms either. This stove feels fragile. Arms bend too easy. The Piezo ignition switch feels like it's barely on. Luckily it comes with a case. You'll need it to protect the stove while backpacking.

Stove
Top of the arms fold in to make for easy stowing.

In ideal conditions the Etekcity stove performs as well as any canister stove in its class. On warm days with no wind It routinely made 3 minute boil times. When conditions aren't ideal however is when this stove really falls short. Usually I don't put too much credence in boil times. I often ask people "what's the hurry?" There are instances however where getting an early start is imperative, and in such cases a fast boil time is important. Case in point: Last winter hunting in the Sonoran desert. I brought the Etekcity stove, and my mate brought an MSR PocketRocket. We were up every morning before light, and literally everyday we had to wait on my stove to boil water. It was frustrating for both of us. In near freezing temps with a bit of wind it took my stove three times longer to boil water for coffee then his PocketRocket. Let me tell you, waiting 15 minutes for a cup of coffee at 5:30 in the morning, for five days straight, sucked.

It's important that your backpacking stove is reliable. It needs to work, even on a shitty day. It needs to work when it's dirty and wet. Testing the Etekcity stove in my backyard one day, I discovered that it had gotten wet from being left outside under a tree dripping water from melting snow. Although entirely accidental, I thought it would be a perfect time to fire the stove up, because after all, sometimes in the field stuff gets wet. The full results of the test are in the video below, but in a nutshell, the stove failed miserably. The stove was totally fouled by water to the point that fuel would not reach the burner. The water wouldn't drain. It took me around an hour to finally get the stove working, and even then the Piezo ignition switch was worthless. Just for comparison purposes, I left my PocketRocket in the same place, for the same amount of time. Although just as wet, the PocketRocket fired up immediately.


In this case you get what you pay for. After a year with the Etekcity stove my conclusion is that it is not reliable or durable. Frankly, I'm not sure it would survive a season of regular use backpacking. After the poor performance my first trip out with it, I was too scared to take it backpacking. Yes, in ideal conditions it boils with the best of them. If you only backpack short trips in sunny weather and you're flat broke, then maybe consider the Etekcity Backpacking Stove. If you buy it, rip the Piezo ignition switch off and save yourself a little weight and a lot of future headaches. Everyone else, spend a few more dollars and buy something actually made for the outdoors.


Sunday, January 29, 2017

Oregon Badlands Wilderness: Flatiron Rock

 In the midst of the worst winter central Oregon has seen in 25 years, finding a place to recreate can be a bit of a challenge. Mainly because unplowed roads promise misery for the unprepared driver. I don't want to join the ranks of the many snowbound vehicles I have seen on forest roads in the last couple weeks. So I head to the Badlands. Flatiron Rock trailhead is literally just off the highway. I don't have to navigate any treacherous forest road to get there. I just make a left from U.S. Route 20, and boom, I'm in the parking lot.

Ancient Juniper
A couple route options exist from Flatiron Rock trailhead. We combined Flatiron Trail with Ancient Juniper Trail to form a 7 mile lollipop loop. The scenery in the Badlands doesn't really change, no matter what part of the wilderness you're in. It's relatively flat and covered in old gnarly Junipers (some over 1000 years old), but Ancient Juniper trail had some of the biggest Junipers that I've seen in the wilderness. Some were old and dying and others lush and green. We noticed several were cut with saws, including the Juniper in the photo above. It looked like someone cut a V into it with a chainsaw and then just walked away.

Jonah
 Flatiron Rock is much more discreet than its neighbor Badlands Rock to the east. It doesn't stab upward like Badlands does. Nevertheless, the views from the top are almost just as impressive. From the northwest corner of the rock the cascade range was clearly visible as far north as Hood. I've heard that Flatiron Rock hides a lot of little caves and crevices ripe for exploration, but the amount of snow made finding such places impossible. 

Views of the cascade range.

As usual in the Badlands, we didn't see many people. We also didn't hear any birds... like at all. It's weird because if you read my blog regularly you may recall that I'm constantly remarking about the huge number of birds I see and hear in the Badlands. In fact, since my last visit I've read that the Badlands and surrounding desert host over 100 different species of bird. Today however, I didn't hear a peep. Maybe they were all hunkered down trying to stay warm. 


Hike out


Monday, January 23, 2017

China Hat: Bessie Butte

China Hat is a spot that I've been wanting to explore since moving to Bend last summer. I've heard people talk about it a lot, seemingly because China Hat hosts any activity under the sun (and moon), including hiking, caving, camping, snowmobiling, skiing, shooting, hunting and unfortunately even dumping. The drive is easy from Bend. From my place I can be on China Hat road in 5 minutes. The drive out to Bessie Butte will depend on the road conditions, but is generally around 10 minutes upon reaching China Hat Road (in winter it can be sketchy because the road is not plowed). This ease of access is one reason this area is so popular. The other reason is that it seems far less regulated than other national forest lands in the area.

Three Sisters in the background.
In a land formed by lava and dominated by buttes, Bessie Butte is not one of the tallest. It does however stick out like a sore thumb due to a fire a few years back that really thinned out the plant life immediately surrounding it. Because of this, from the road Bessie Butte appears much larger than the surrounding buttes. We had the trail to ourselves as we made our ascent in freezing temperatures and a bitter wind. I was immediately struck by the absolutely eye-popping views. Even in winter the 1.5 mile hike to the top was easy. On this day we didn't need snowshoes or traction devices, but sunglasses and a beanie were a must. But those views!! It was a perfectly clear sunny day and those Cascades were majestic.

Almost to the top.
At the top the views were even better. Mount Bachelor, the Three Sisters, Jefferson and even Hood were all clearly visible. Literally, on that fine day, we could see as far as the eye could see in any direction. It was totally awesome, and one of the best views I've had in Bend thus far. 

View east from Bessie Butte summit.
The top of Bessie Butte is big. We saw a couple fire rings and I thought it would make an excellent spot to overnight. The views at dawn and dusk would be totally epic. We also saw a rock pile and a makeshift cross fashioned from twigs. The dogs took a keen interest and were trying to overturn rocks to get at whatever was underneath. I guessed the grave contained someone's pet, but who knows. Regardless, I cant think of a better place to be buried. Shoot, I'd like to be buried there.

Grave on Bessie Butte
The hike was short and easy, but the views make it absolutely worth it. Weather permitting, I would like to get out to China Hat again and explore more. There are a handful of caves I want to check out, and of course, never ending buttes. There are some drawbacks about recreating in China Hat. For starters, there are a lot of forest roads, and therefore a lot of offroad style vehicles that make a lot of noise. Also, apparently China Hat is the premier local spot for shooting. We heard plenty of gunfire and saw people parked off the side of the road just shooting into the forest. Hiking in an area that people use to shoot can be a little unnerving, especially when you see people not being responsible about it. Also, in my experience, areas that see high amounts of recreational shooting also see high amounts of trash from shooting, like spent casings, shot-up bottles and cans, and remnants of clay pigeons. Didn't see any of that first hand in China Hat, and hopefully I never do.

Bessie Butte descent.

Clarifying place names - "China Hat" is an area of the Deschutes National Forest just south of Bend, Oregon. The specifics of location are difficult to define because China Hat is not the official name. Rather, it's the name given to the area by locals. If a local says, "I'm going hiking in China Hat," they are referring to a large geographical area with undefined borders. China Hat is named after the best road that runs roughly north/south through the area, China Hat Road, which is in turn named after China Hat Butte. China Hat Road and China Hat Butte are defined places found on a map or Google search. China Hat is not. Unofficially, China Hat is bordered by Bend to the north, Highway 97 on the west, and Newberry National Volcanic Monument south and west. The eastern boundary is even more challenging to define, but I'll say that if you reach Horse Ridge Natural Area, you've gone too far. If you feel this description is incomplete or inaccurate, please feel free to send me an email with your thoughts. writerinthewild@gmail.com

Monday, January 16, 2017

Oregon Badlands Wilderness: Badlands Rock

Old Juniper on the Badlands Rock Trail

The Oregon Badlands Wilderness is quickly becoming my "go to" spot for hiking and exploration. Access is less than 30 minutes from town, yet the crowds are nonexistent. My original plan for this day was to check out Tumalo Falls, but when I arrived vehicles lined the road leading to the trailhead and people poured from them with snowshoes and nordic skis. It was so crowded that I immediately turned around and headed for the Badlands. Solitude is a big part of why I like the outdoors, and nothing outside turns me off faster than crowds.

An hour later I'm in the Badlands. The hike was usual Badlands fare; flat terrain, Junipers aplenty and all the solitude a man could want. Unlike my first foray into this wilderness, Badlands Rock Trail occasionally opens up to views of the surrounding hills. The Junipers here are more sparse. The country just feels more open. I'm struck by the sheer number of birds I see and hear in this wilderness. I'm accompanied by birdsong everywhere I go. 

From atop Badlands Rock
I was surprised by the size of Badlands Rock when it finally came into view near the 2.5 mile mark. I wasn't expecting it to be so big, and was overcome with the urge to climb it. The scramble was a bit tricky due to ice and snow, but the view from the top has to be the best in the entire Oregon Badlands. 

Unnamed hiker on top of Badlands Rock

More views.
From Badlands Rock, one has two options for longer loop hikes. I went west on Castle Trail which had not been used since the most recent snowfall. Breaking trail was slow going. By the time I reached The Castle (halfway between Badlands Rock and The Flatiron) I felt like I was on a race against time to beat the setting sun, so I retraced my steps back to the trailhead and made it just in time. This area definitely deserves so more exploration. I like the idea of backpacking here, but being a relatively new wilderness, and playing second fiddle to the cascades, I have not seen nor heard of any backcountry campsites... Until next time.

Breaking trail